User Management in Overleaf
info This page is for Overleaf group subscription administrators and managers. If you’re not an admin or manager but want to learn more about managed user accounts, see our information for users.
Our Managed Users feature gives you more control over your organization’s use of Overleaf. It ensures tighter management of user access and deletion and allows you to keep control of projects when someone leaves the organization. This feature is only available to Overleaf Group Professional subscribers.
What’s the difference between a managed Overleaf account and an unmanaged Overleaf account?
If you enable Managed Users for your group, members of the subscription will not be able to:
- Delete their account
- Change their account email address
- Have a secondary email address (or add a secondary address)
- Link their account to ORCID
- Start a new subscription or join another subscription using the same email address
The group adminstrator role
Managed Users can only be enabled by a group subscription adminstrator. Once it's enabled, the administrator and group managers will have admin rights over managed user accounts. Administrators and managers will be able to:
- Delete any subscription member account
- Reassign ownership of projects when the original owner’s account is deleted
How to enable and use Managed Users
Enabling Managed Users
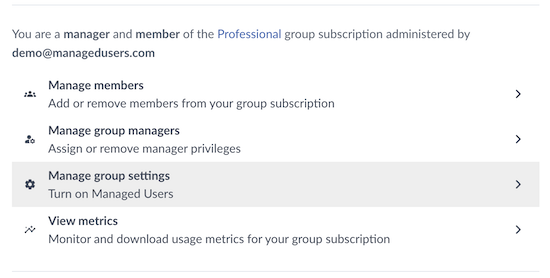
1. To enable Managed Users, first, navigate to your subscription settings, then click Manage group settings.
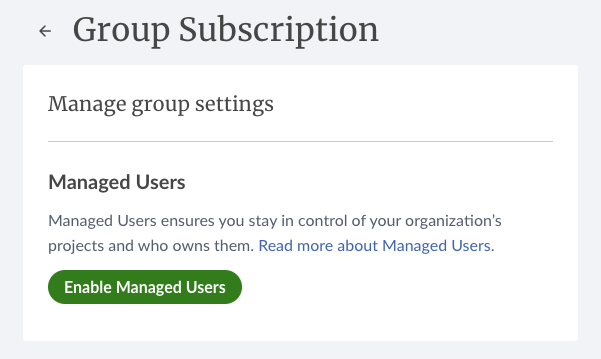
2. Under Manage group settings, go to the Managed Users section and select Enable Managed Users.
3. You’ll be asked to confirm that you accept Overleaf’s terms and conditions. Once you’ve done this, you can click Enable Managed Users.
4. Clicking Enable Managed Users will automatically send invitations to all your existing group members to transfer the management of their accounts to you. The email they receive will clearly explain the differences between managed and unmanaged accounts, as well as how to keep their personal projects separate. This information is also available on the managed user accounts page.
Reviewing the managed status of group members
1. You can review the managed status of your group members by going to your subscription settings and selecting Manage group members.
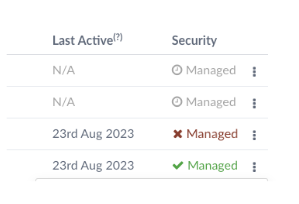
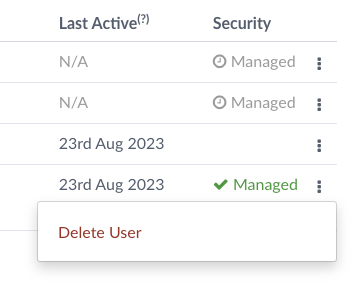
2. On the Member management page, you’ll see a table of subscription members and people invited to the subscription. Those that are managed will be clearly indicated in the Security column with a green tick and the word “Managed.”
3. If they’re already a subscription member, but haven't yet accepted your invitation to become managed, there will be a red cross. Those that have been invited to the subscription but haven't yet joined it will show as Pending invite, with a clock icon.
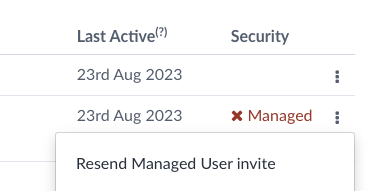
4. If a member doesn’t respond to your initial invitation to transfer management of their account, you can send them a reminder email by clicking the three-dot menu and selecting Resend Managed User invite.
Inviting new users to your subscription
You can find out how to invite new members to your group subscription in Managing a group subscription.
Depending on whether the person you’re inviting is an existing Overleaf user or a new user, they will either be asked to transfer management of their account or to register for an account that’s managed. In both cases, the concept of managed user accounts and what this means for them will be clearly explained to them in the email invitation to join the subscription.
Deleting users and transferring project ownership
If someone with a managed user account leaves your group or organization, you can delete their account. When you do this, you’ll also need to transfer their projects to another subscription member.
1. To delete a user, go to your subscription settings and select Manage group members.
2. On the Member management page, you’ll see a table of subscription members. To delete a user, click the three-dot menu on the row of the table corresponding to that user and select Delete user.
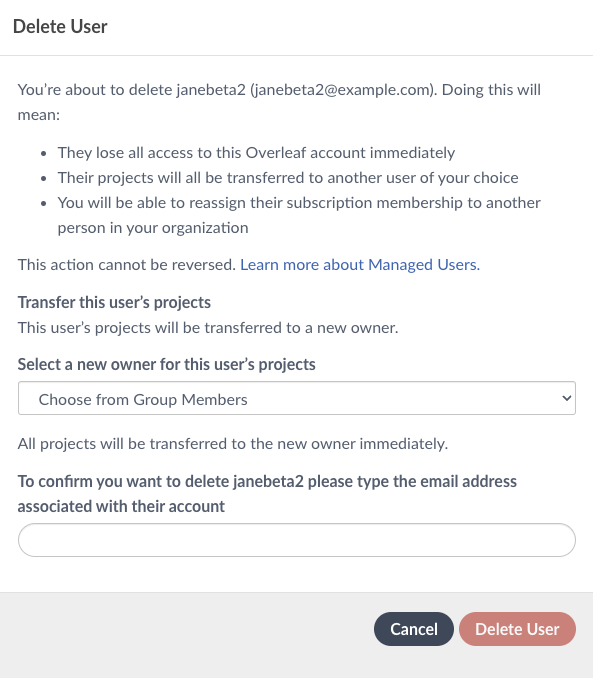
3. The next screen explains the implications of deleting a user and asks you to select who you would like to transfer the deleted user’s projects to. As a final step, you’ll be asked to enter the email address associated with the account you’re deleting. This is to ensure that you’re absolutely certain you want to delete the account. Once you’ve entered the required information, click Delete user.
4. You will then see a screen showing you the progress of the project transfer.
Still need help?
If you need help with any aspect of user management, please contact support@overleaf.com.
Overleaf guides
- Creating a document in Overleaf
- Uploading a project
- Copying a project
- Creating a project from a template
- Using the Overleaf project menu
- Including images in Overleaf
- Exporting your work from Overleaf
- Working offline in Overleaf
- Using Track Changes in Overleaf
- Using bibliographies in Overleaf
- Sharing your work with others
- Using the History feature
- Debugging Compilation timeout errors
- How-to guides
- Guide to Overleaf’s premium features
LaTeX Basics
- Creating your first LaTeX document
- Choosing a LaTeX Compiler
- Paragraphs and new lines
- Bold, italics and underlining
- Lists
- Errors
Mathematics
- Mathematical expressions
- Subscripts and superscripts
- Brackets and Parentheses
- Matrices
- Fractions and Binomials
- Aligning equations
- Operators
- Spacing in math mode
- Integrals, sums and limits
- Display style in math mode
- List of Greek letters and math symbols
- Mathematical fonts
- Using the Symbol Palette in Overleaf
Figures and tables
- Inserting Images
- Tables
- Positioning Images and Tables
- Lists of Tables and Figures
- Drawing Diagrams Directly in LaTeX
- TikZ package
References and Citations
- Bibliography management with bibtex
- Bibliography management with natbib
- Bibliography management with biblatex
- Bibtex bibliography styles
- Natbib bibliography styles
- Natbib citation styles
- Biblatex bibliography styles
- Biblatex citation styles
Languages
- Multilingual typesetting on Overleaf using polyglossia and fontspec
- Multilingual typesetting on Overleaf using babel and fontspec
- International language support
- Quotations and quotation marks
- Arabic
- Chinese
- French
- German
- Greek
- Italian
- Japanese
- Korean
- Portuguese
- Russian
- Spanish
Document structure
- Sections and chapters
- Table of contents
- Cross referencing sections, equations and floats
- Indices
- Glossaries
- Nomenclatures
- Management in a large project
- Multi-file LaTeX projects
- Hyperlinks
Formatting
- Lengths in LaTeX
- Headers and footers
- Page numbering
- Paragraph formatting
- Line breaks and blank spaces
- Text alignment
- Page size and margins
- Single sided and double sided documents
- Multiple columns
- Counters
- Code listing
- Code Highlighting with minted
- Using colours in LaTeX
- Footnotes
- Margin notes
Fonts
Presentations
Commands
Field specific
- Theorems and proofs
- Chemistry formulae
- Feynman diagrams
- Molecular orbital diagrams
- Chess notation
- Knitting patterns
- CircuiTikz package
- Pgfplots package
- Typesetting exams in LaTeX
- Knitr
- Attribute Value Matrices
Class files
- Understanding packages and class files
- List of packages and class files
- Writing your own package
- Writing your own class