Page size and margins
Introduction
The page dimensions in a LaTeX document are highly configurable and the geometry package offers a simple way to change the length and layout of different elements such as the paper size, margins, footnote, header, orientation, etc.
Example
Suppose you need to create a document using A4-sized paper with a text area which shouldn't exceed 6 inches wide and 8 inches high. You can easily create such a document by including this line in your LaTeX preamble:
\usepackage[a4paper, total={6in, 8in}]{geometry}
The parameter values passed to the geometry package produce our required layout. In this case, a4paper establishes the desired A4 paper size and values supplied to the total parameter determine the size of the text area. Note that Overleaf uses a European LaTeX distribution, which produces documents in A4 size by default.
\documentclass{article}
\usepackage{blindtext}
\usepackage[a4paper, total={6in, 8in}]{geometry}

\begin{document}
\section{Introduction}
This is a test document which uses A4-sized paper and the user-defined text area.
\subsection{Some dummy text}
\blindtext[8]

\end{document}
Paper size, orientation and margins
Modifying a document's paper size, orientation and margins is a common requirement which can easily be achieved using the geometry package. There are two ways to set the desired values:
- provide them as parameters to the
\usepackagestatement as in the example above, or - use the
\geometrycommand in the preamble.
For example, let's create a document with legal paper size, landscape orientation and a 2 in margin:
\usepackage[legalpaper, landscape, margin=2in]{geometry}
You can achieve the same thing in a slightly different way:
\usepackage{geometry}
\geometry{legalpaper, landscape, margin=2in}
As you see, the parameters are comma separated. For a complete list of predefined paper sizes, see the reference guide. The second parameter is the orientation, its default value is portrait. Finally, each margin is set to 2in.
Fine tuning your LaTeX page dimensions
Visualizing the layout
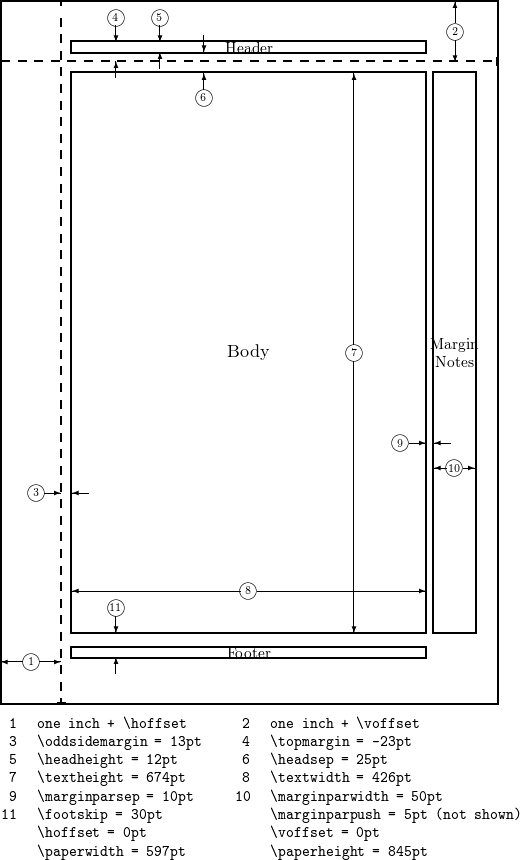
The layout package provides a very convenient solution to visualizing the document's current layout—and the values of various LaTeX parameters which determine that layout. It provides two commands: layout and layout* which draw a graphic representing the current layout. The starred version (layout*) recalculates the internal values used to draw the graphic, which can be useful if you make changes to LaTeX's page-layout parameters. Here is an example:
\documentclass{article}
\usepackage{layout}
\begin{document}
\section{Default \LaTeX{} layout}
Here's the default layout:

\vspace{10pt}
\layout
\section{Make some changes}
Make changes to the margin paragraph settings and use the command \verb|layout*| to redraw the page layout diagram:
\vspace{10pt}
\setlength{\marginparwidth}{0pt}
\setlength{\marginparsep}{0pt}

\layout*
\end{document}
Open this example in Overleaf to view the results!
The following image shows an example of the graphic produced by the layout package.
Using the geometry package layout parameters
The geometry package provides an interface to change page dimensions using intuitively-named parameters which need to be written in the form parameter=value, using standard LaTeX units (mm, cm, pt, in). The following list makes reference to the page-layout graphic provided in the previous section.
textwidth- Corresponds to element 8 in the graphic.
textheight- Element 7 in the graphic.
total- Depends on other parameters, by default defines the dimensions of the Body, but can be combined with the
includehead,includefoot,includeheadfootandincludempcommands to change the dimensions of Header, the Body, the Footer and the Margin Notes altogether.
left,lmargin,inner- These three parameters change the length of the left margin. Elements 1 and 3 in the graphic, combined.
right,rmargin,outer- These three parameters change the length of the right margin. Elements 9 and 10 in the graphic, combined.
top,tmargin- These two parameters represent elements 2 and 6 in the graphic, combined.
bottom,bmargin- These two parameters set the distance from the bottom edge of the document to its baseline.
headheight- Height of the header
headsep- Separation between header (baseline) and text body. Element 6 in the graphic.
footnotesep- Separation between the bottom of text body (baseline) and the top of footnote text.
footskip- Distance separation between baseline of last line of text and baseline of footer.
marginparwidth,marginpar- Width of the margin notes. Element 10 in the graphic.
The paper size can be set to any size you need by means of the command papersize={⟨width⟩,⟨height⟩}.
Let's see an example with some of the aforementioned options:
\documentclass{article}
\usepackage{blindtext}
\usepackage{geometry}
 \geometry{
 a4paper,
 total={170mm,257mm},
 left=20mm,
 top=20mm,
 }
\begin{document}
\section{Some dummy text}
\blindtext[10]
\end{document}
This example produces the following output:
Here the text area, the left margin and the top margin are set. The right and bottom margins are automatically computed to fit the page.
Reference guide
| parameter | description | values |
|---|---|---|
| papersize | Determines the size of the paper | a0paper, a1paper, a2paper, a3paper, a4paper, a5paper, a6paper,b0paper, b1paper, b2paper, b3paper, b4paper, b5paper, b6paper,c0paper, c1paper, c2paper, c3paper, c4paper, c5paper, c6paper,b0j, b1j, b2j, b3j, b4j, b5j, b6j,ansiapaper, ansibpaper, ansicpaper, ansidpaper, ansiepaper,letterpaper, executivepaper, legalpaper |
Further reading
For more information see: